A wolf cut can look dramatically different depending on one small detail: where you create volume. Lift the crown and separate the ends, and those shaggy layers suddenly look intentional. Flatten the roots or weigh everything down with product, and the same haircut can lose much of its shape.
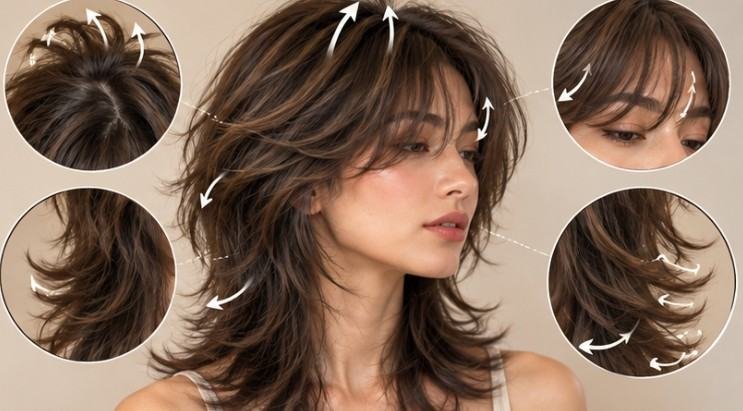
That is the real secret behind learning how to style a wolf cut at home. You do not need salon-level blow-drying skills. You need to understand what the haircut is designed to do: create height near the top, movement through the middle, and lighter, piecey texture toward the ends.
Whether your hair is straight, wavy, curly, thick, or relatively fine, the best routine is the one that works with that architecture rather than fighting it.
Why a Wolf Cut Needs a Different Styling Approach
A wolf cut combines elements of a shag and a modern mullet. Most versions feature shorter layers around the crown and face, longer sections underneath, and bangs or face-framing pieces that connect the two.
Because there is less weight in the upper layers, those pieces can naturally lift away from the scalp. Styling should emphasize that lift while keeping the lower sections loose and mobile.
This is why coating the whole head in heavy creams or oils often backfires. The cut usually benefits more from strategically placed mousse, root spray, curl cream, or lightweight texture products.
Your first decision should therefore be about the finish you want rather than the tool you want to use.
| Desired finish | Best approach | Key styling goal |
| Big, polished volume | Round-brush blowout | Lift the crown and sweep layers outward |
| Messy, lived-in texture | Air-dry or diffuse | Encourage natural bends and separation |
| Defined retro layers | Blow-dry plus iron | Bend different layers in contrasting directions |
| Natural curls or waves | Curl cream plus diffuser | Define texture without flattening the crown |
Prep the Hair Before You Start Styling
Start with damp hair rather than soaking-wet hair. Gently squeeze out excess water with a microfiber towel or soft cotton T-shirt instead of aggressively rubbing the hair.
That matters because wet hair can be more vulnerable to mechanical stress. University of Utah Health notes that wet strands are more fragile and potentially more susceptible to breakage from friction. Their guidance recommends blotting rather than rubbing wet hair.
Next, build your product layers according to your hair type. For fine or straight hair, concentrate a small amount of volumizing mousse or root-lift spray around the crown. For wavy hair, use mousse or a light texture spray through the lengths. Curly hair may respond better to a curl cream or lightweight gel scrunched through damp sections.
If you plan to use hot tools, apply an appropriate heat-protection product before styling.
Avoid soaking the ends in oil before a blowout. You can always add a tiny amount later if the hair needs shine.
Method 1: Create the Classic Voluminous Wolf-Cut Blowout
The big, airy blowout is probably the easiest way to exaggerate the haircut’s signature silhouette.

Start at the Crown
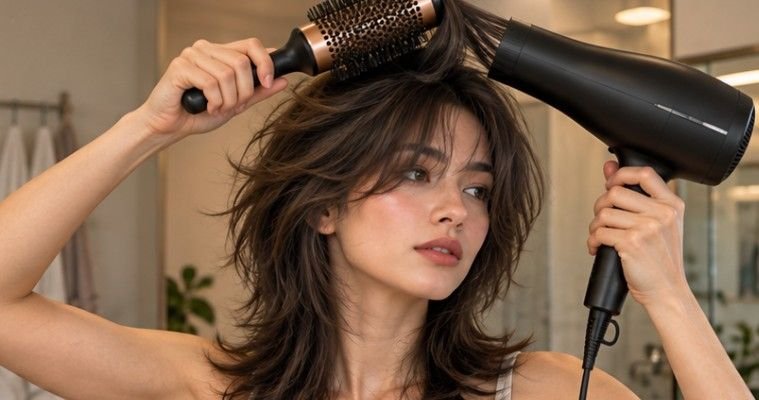
Dry the roots first while lifting the hair away from the scalp with your fingers or a vented brush. Directing the airflow upward at the crown creates height before you begin shaping individual layers.
Once the roots are mostly dry, take medium-sized sections with a round brush. Pull the upper layers upward rather than straight down. Keep the dryer moving instead of holding concentrated heat in one spot.
Research indexed by the National Library of Medicine found increasing hair-surface damage as dryer temperature rose. In the experiment, drying from about 15 centimeters away while continuously moving the dryer caused less damage than closer, hotter drying conditions.
Flip the Mid-Length Layers Outward
Once the crown has volume, focus on the shorter pieces around the cheekbones, jaw, and shoulders.
Wrap each section around the round brush and direct it backward, away from your face. Let the ends flick outward instead of trying to create perfectly uniform curls.
Wolf cuts tend to look better with controlled inconsistency. Some pieces can curve inward while neighboring layers flip outward. That contrast reveals the haircut’s separation.
Give Curtain Bangs Their Own Shape
Bangs can completely change the finished result. For curtain bangs, bring the entire fringe forward first. Place a round brush underneath and direct the hair upward and backward with the dryer. Once almost dry, separate the bangs down the middle and guide each side away from your face.
Allow them to cool before repeatedly touching them. The goal is a soft bend rather than a tightly curled fringe.
Method 2: Air-Dry for a Tousled, Lower-Effort Finish
A wolf cut does not need to be blown out every morning. In fact, naturally wavy and curly textures can make its layers more noticeable with very little styling.
Apply mousse, curl cream, or another lightweight defining product to damp hair. Scrunch upward from the ends rather than smoothing everything downward.
Then leave it alone while it dries.
Constantly touching drying waves can disturb their grouping and create unnecessary frizz.
If your roots tend to collapse, use small root clips around the crown while the hair dries. This holds short layers away from the scalp without requiring much heat.
Readers with naturally textured hair may also benefit from building a consistent curly hair care routine rather than treating styling as a one-day fix.
Method 3: Diffuse When You Want More Definition

A diffuser sits between air-drying and a traditional blowout. Apply your styling product, tilt your head slightly, and gather sections into the diffuser bowl. Use a lower airflow setting so you do not blast apart your natural wave or curl pattern.
Move around the head gradually instead of repeatedly disturbing one area. The American Academy of Dermatology recommends reducing excessive heat exposure and allowing hair to partially air-dry before styling where practical. It also recommends low or medium settings for flat irons and minimizing damaging grooming habits.
Use a Flat Iron or Curling Iron for Piecey Ends
Hot tools are useful when your layers refuse to separate naturally, but you do not need to curl the entire head.
Take random sections and use a flat iron to create a slight bend through the ends. Direct some away from the face and leave others straighter. You can also use a small curling iron for the shorter crown layers.
Always style dry hair rather than clamping a hot iron onto wet strands.
Research on wet hair and thermal styling found considerably more structural damage when heated tools were applied in the presence of water. A clinical report also documented thermal hair-shaft injury following hot ironing of wet hair.
The 60-Second Wolf-Cut Check
Before adding more product, look at your finished style from three angles.
Check the crown first. Can you see visible lift, or has everything collapsed?
Then inspect your face-framing layers. They should move independently rather than merging into one heavy shape.
Finally, examine the bottom few inches. If they look too polished, separate several sections with your fingertips.
Rub only a pea-sized amount of styling balm or texture paste between your hands and pinch a few selected ends. Do not coat every layer.
That final bit of separation often makes a bigger difference than adding another round of curling.
Mistakes That Make a Wolf Cut Look Flat
The first is applying too much product at the roots. Heavy conditioners, oils, butters, and waxes can pull shorter layers downward.
The second is straightening every layer in exactly the same direction. Perfect uniformity removes much of the movement that makes the cut recognizable.
The third is repeatedly using very high heat because you assume more heat means longer-lasting style. Dermatologists at Johns Hopkins advise minimizing heat styling because frequent dryers, irons, and curling tools can contribute to hair damage. Read their hair-care recommendations.
UC Davis Health similarly recommends gentle hair-care habits, including avoiding high-heat styling.
If repeated styling is leaving your ends thin and fragile, reducing breakage can also help you retain length. These tips for growing hair faster explain why length retention matters as much as growth itself.
FAQs
1. How do you style a wolf cut every morning?
Refresh the roots with water or lightweight volumizing spray, reshape the bangs, and scrunch or bend several face-framing layers. You usually do not need to restyle your entire head.
2. Can you style a wolf cut without heat?
Yes. Apply mousse, curl cream, or texture spray to damp hair, scrunch the layers, lift the crown with root clips, and allow the hair to dry naturally.
3. What products are best for a wolf cut?
Lightweight mousse, root-lifting spray, sea-salt or texture spray, curl cream, heat protectant, and a small amount of styling paste work well. Choose products according to your hair texture.
4. Why does my wolf cut look flat?
The usual causes are heavy products, insufficient crown lift, layers being styled downward, or hair that has grown enough for the shorter sections to lose their original shape.
Final Takeaway
Learning how to style a wolf cut at home is less about mastering complicated salon techniques and more about preserving the haircut’s built-in contrast. Keep the crown light, encourage movement through the middle layers, give the bangs their own direction, and separate the ends rather than polishing everything into one shape.
Some mornings that may mean a full round-brush blowout. Other days, mousse and ten seconds of scrunching may be enough.
The best wolf cut should not look as though every strand was forced into position. Its appeal comes from controlled disorder—and once you understand where the volume belongs, creating that effect becomes surprisingly manageable.